4.3. BrewPi Controller Configuration
Once your BrewPi controller is set up within Fermentrack it’s ready for configuration. If you’ve already configured your controller on either another installation of Fermentrack or an installation of brewpi-www, then you may already be ready to go. Otherwise, just follow these instructions to get on your way.
- Go to your Fermentrack installation’s main page, and click “View Dashboard” underneath the device you wish to configure.
- From the menu at the top with your device’s name, choose “Configure Sensors/Pins/Devices”
- A screen will appear showing you the configuration status of your device. At a minimum, you need to have a cooling pin and chamber sensor set for your device to operate.
- Configure each of the devices listed under “Available Devices” that you plan to use.
4.3.1. Heating/Cooling/Door Sensor Pin
Heating/cooling are configured by pin number. In most cases the correct pin will be prescribed, with the function listed out in the name. (On ESP8266 devices, for example, you will see a header similar to “Pin 16 ( D0 (Heat))”. This is generally the “heat” pin.)
To configure, simply choose the device function from the drop down menu (Heating Relay, Cooling Relay, etc.), set whether or not your relay requires the pin to be inverted (for most mechanical relays, you want Invert Pin to be “Inverted”) and click “Assign”
Warning
While the door sensor pin will generally appear as available to configure, you should not set this pin unless you have an actual door sensor connected to your controller. If you set this up incorrectly your controller may think the door to your fermentation chamber is always open, and fail to trigger heating/cooling as expected.
4.3.2. Temperature Sensors
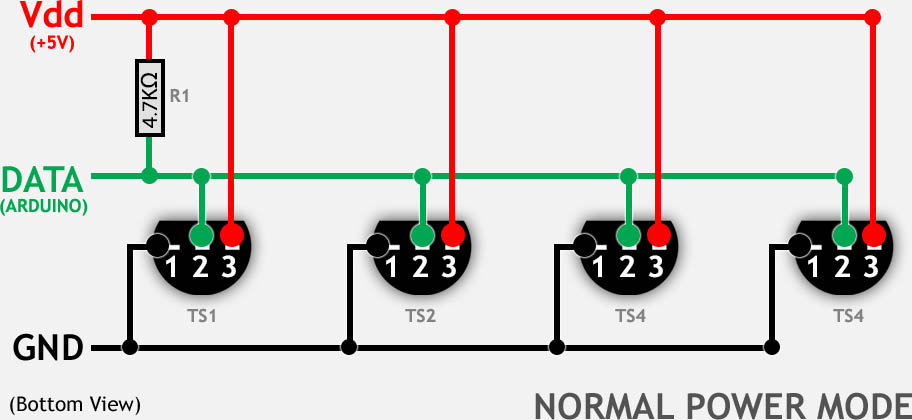
Fermentrack supports the DS18B20 temperature sensors, which use the OneWire protocol. This allows multiple sensors to be connected via a single pin on the controller board. For the ESP8622 board, this is the D6 pin. To ensure stable data transfers, you will also want to include a 4.7K resistor between the voltage source and the data pin. An example of how to gang multiple temperature sensors together, with resistor, looks like this:
Each temperature sensor will be configured by its own hard-coded device address once it is connected to Fermentrack. You should see all connected temperature sensors listed under either Available Devices or Installed Devices.
To install an available temperature sensor, simply choose the device function (Chamber Temp, Room Temp, Beer Temp, etc.) and click “Assign”. Your BrewPi controller will configure the device appropriately.
4.3.3. Other Options (Chamber fan, chamber light, etc.)
While the BrewPi controller firmware allows for other options to be selected such as chamber fan, chamber light, etc. these options don’t actually do anything and should be ignored.